[Most Recent Entries] [Calendar View] [Friends]
Below are 20 journal entries, after skipping by the 40 most recent ones recorded in
Hack a Day's LiveJournal:
| Tuesday, December 31st, 2013 | |
| 12:01 pm | Case Modder Builds LCD Window; Causes LSD Flashbacks
[Chris, aka Mosquito's Mods] is well-known for some awesome PC case mods. He’s outdone himself this time with an embedded LCD panel as his case window. This use of an LCD is becoming common on arcade games and slot machines. [Chris] was inspired by an arcade game he saw at a local Dave & Buster’s. He started with an off the shelf 16″ USB LCD monitor from AOC. [Chris] then stripped off the back light, diffuser, and reflectors. Left with the bare panel and polarizers, he then created an LCD sandwich of sorts. First a layer of 2mm acrylic. Then the LCD and panel, along with 4 strips of acrylic forming a frame around the LCD. The frame strips are in blue in the image after the break.
The final layer is a thick piece of 6mm acrylic. The thick acrylic keeps the window assembly from bending, which would lead to a cracked LCD. The entire assembly is held together with 3M scotch 4010 tape. White LED strips around the LCD shine plenty of light into the case, allowing the images on the LCD to be seen. The final effect is stunning. Images on the LCD appear to be floating in space somewhere behind the window. The effect works best with back and white images, as color is understandably a bit washed out.
[Thanks Kyle!] Filed under: computer hacks  |
| 9:01 am | Barbot Mixes Drinks Perfectly with Web Interface
Are you good at mixing drinks? We think this Barbot might give you a run for your money! Not only does this Barbot have room for 5 different liquors, but you can combine them any way you want with an extremely slick web interface that you can check out for yourself. During initial setup, you add your chosen liquors to the machine and then using the configure mode in the web interface, you tell Barbot what it has to work with. Once these fields are populated, Barbot will list various drinks that it is capable of mixing with the provided ingredients. It also has a cleaning mode, which allows you to prime the pumps and set administrative access for your parties. The hardware behind this build is a BeagleBone Black running Ubuntu 13.04 with Apache2, MySQL, and PHP to host the web interface — bind and DHCP are used to create the web portal using a USB WiFi dongle. The online interface directly controls the pumps using PHP via the GPIOs. To see a full demonstration stick around after the break for the included video.
Filed under: cooking hacks, robots hacks  |
| 6:00 am | POV Display with an Element of Danger
Persistence of vision displays are always cool, although we must admit this one looks like it could very well explode at high speeds… Safety concerns aside, this desk fan based display provides a great starting point for learning about making POV displays. It makes use of an old cellphone battery, an ATmega8, some LEDs, Veroboard, assorted wires and solder and of course, a high-speed desk fan. [shparvez001] also provides the full code on his blog for the project, making it very easy to replicate. Though we might also suggest you keep it small enough that the original fan cage still fits on top. From an aesthetic point of view, the display looks fine in the dark — but when the lights are on you might get some odd looks. We can see this project being greatly improved by mounting the LEDs through one of the fan blades, and the control electronics on the back side of the other blades. Maybe throw in some wireless charging for the battery while the fan is off too? Anyway, stick around after the break to see the display in action. If you want a more permanent fan POV try adding display hardware to a ceiling unit.
Filed under: led hacks, Microcontrollers  |
| 3:00 am | The Geek Group Installs Robot, Destroys CRT Monitor
The Geek Group recently documented the process of overhauling part of their workspace to accommodate Project Jeff, a massive KUKA KR-350/1 industrial robot. We don’t see many behind the scenes industrial-scale projects here at Hackaday, but we’re definitely impressed with the clever techniques employed to pull off this precision install. At around 5 inches deep, the original floor was far too thin to handle the weight and tortional loads imposed by Project Jeff, so The Geek Group carved out a 15′ square space of old concrete and dumped it piece by piece in the rubbish. They then dug a new hole to a depth of 2.5′ and filled it with a fresh pour that amounted to 67,500 pounds of concrete. Sheesh. That concrete will inevitably expand and move around, which meant installing a pool-noodle-looking slip cover to protect a buried conduit from damage, as well as placing some gaskets around the edges to prevent cracking while maintaining a seal. Around 10 minutes into the video, they tackle the challenge of embedding bolts that connect to the robot’s base; it takes some patience and creative ladder positioning to fit the template in the correct position. As an added treat, The Geek Group smashed a CRT monitor in our honor, and while they claim software limitations and a steel frame prevented Project Jeff from completely annihilating the monitor, we like to think the skull and cross-wrenches just refused to be destroyed. Because, you know, science. Videos after the break.
[Thanks Ryan and Andrew] Filed under: Hackerspaces  |
| 12:00 am | Roving Hexapod Poops Out 3D Prints
[Jia Wu, Mary Sek, and Jeff Maeshiro], students at the California College of the Arts (CCA) in San Francisco, took on the task of developing a walking 3D printer. The result is Geoweaver, a hexapod robot with a glue gun extruder system. Hackaday has seen walking CNC machines before, but not a 3D printer. Geoweaver uses two servos on each of its six legs to traverse the land. The team was able to program several gaits into the robot, allowing it to traverse uneven terrain. Walking is hard enough on its own, but Geoweaver also uses a glue gun based extruder to make 3D prints. The extruder head uses two servos to swing in a hemispherical arc. The arc is mapped in software to a flat Geoweaver’s prints may not be much to look at yet, however the important thing to remember is that one of the future visions for this robot is to print on a planetary scale. Geoweaver currently uses reacTIVision to provide computer control via an “eye in the sky”. ReacTIVision tracks a fiducial marker on the robot, and applies it to a topographical map of the terrain. This allows Geoweaver to change its height and print parameters depending on the flatness of the ground it is printing on. On a scaled up Geoweaver, reacTIVision would be replaced by GPS or a similar satellite based navigation system. Most of the software used in Geoweaver is opensource, including Grasshopper and Firefly, written by the team’s professor, [Jason Kelly Johnson]. The exception is Rhino 5. We would love to see an option for a free or open source alternative to laying out ~$1000 USD in software for our own Geoweaver.
Filed under: 3d Printer hacks, robots hacks  |
| Monday, December 30th, 2013 | |
| 9:00 pm | Hacking and Philosophy: Surveillance State
If you don’t live under a rock (though you may want to now) you probably saw yesterday’s article from Spiegel that revealed the NSA has its own catalog for spy gadgets. Today they released an interactive graphic with the catalog’s contents, and even if you’re not a regular reader of Hacking & Philosophy, you’re going to want to take a look at it. I recommend glancing over IRATEMONK, in the “Computer Hardware” category. As the article explains, IRATEMONK is
It isn’t clear whether the manufacturers are complicit in implanting IRATEMONK in their hardware, or if the NSA has just developed it to work with those drives. Either way, it raises an important question: how do we know we can trust the hardware? The short answer is that we can’t. According to the text accompanying the graphic, the NSA
We’re interested to hear your responses to this: is the situation as bleak as it seems? How do you build a system that you know you can trust? Are there any alternatives that better guarantee you aren’t being spied on? Read on for more.
As for alternatives, I want to pose one scenario as presented by [Hasan Elahi]. You’ve probably seen him on television or his TED talk; he’s the guy who flooded the FBI with data about himself. He came to my university to give a lecture on his experiences with the surveillance state and made some interesting points worth repeating. The first of which is that information is a commodity, and access to your personal life is valuable. By providing these agencies with large amounts of personal data, you’re essentially “flooding the market.” If everyone shared their data to this extent, he thinks the surveillance state couldn’t keep up (and if you haven’t seen [Elahi's] talk, it goes WAY beyond Facebook: he takes pictures of every meal he eats, every toilet he uses, every hotel room…everything). It’s an interesting idea, and if we truly are becoming a culture of sharing, such a future may be inevitable. Perhaps it’s possible to saturate cyberspace with information to the point where our true selves are buried in the noise, and I agree that information overload on a person/individual may paint a very strange misrepresentation—or no clear representation—which could work in your favor. For [Elahi], it’s about reclaiming a sense of control, and that’s something he definitely achieves. Toward the end of his TED talk he shares his server logs, pointing out which government agencies visit his site and when. Perhaps it’s an illusion of control, but [Elahi] is absolutely creating and hosting his own archive rather than wondering whether the government is doing so. (They probably are). Here’s where I break with this strategy: during his lecture at my university, [Elahi] seemed to suggest that interested governmental entities (NSA, FBI, etc.) sort through this data with people, who—when faced with the overwhelming mountain of pointless photographs—will give up trying to profile you. It’s not a person sorting through your data, though. It’s a machine, and it doesn’t care how many thousands of pictures are out there: that’s more material for it to use to make assumptions about you. Their data collection is automatic, global, and seemingly limitless. I suspect they’ll gladly integrate anything you provide and file it away for reference. Let us hear your responses in the comments: is it hopeless? has the list of manufacturers in the catalog influenced your future purchasing decisions? Filed under: Hackaday Columns  |
| 6:01 pm | UFO-looking RGB LED RC Plane Lights Up the Night, Uses All the Acronyms
He used low-tack tape to lay out the LED strips on the fuselage, solder the connections, and test them. Once he was satisfied with the arrangment, he flipped the strips face down so the foam diffuses the light. The lights are powered by a 12V Li-Po battery he soldered to a deans connector. Finally, [Roballoba] covered and heat sealed everything with Doculam, a very cost-effective laminate that offers great protection and security. He used some LED corn lights as afterburners, which is a nice touch of realism. There is a video after the break where [Roballoba] shows us the connections up close and then runs through some light show options. Another video of a nighttime flight is waiting for you in the write up. Spent too much money on eggnog and a new console this year to be able to replicate this build? $30 will snag what you need for this smartphone-controlled paper plane we featured a few weeks back. You could always BeDazzle it.
Filed under: led hacks, toy hacks  |
| 3:01 pm | DIY Incubator Cooks Bacteria… Or Yogurt!
Ever wonder what kind of fecal content is in your drinking water? Do you also like yogurt? If so, this DIY Bacteria Incubator is just for you! [Robin] is part of the BioDesign team for the Real-World project which is an interdisciplinary project featuring biology, electronics, and environmental sciences to bring together solutions for real world water problems. Since it’s a community oriented project they strive to keep it open-source and well-documented in order to share with everyone. The DIY Incubator is a rather simple tool that can be used to help analyze water for fecal contamination, which is a problem in many third world countries. It consists of a styrofoam box, a light bulb and a home-brew Arduino which provides the PID control of the heat. For bacterial analysis, regular coliform bacteria live at 35C, while fecal coliform prefer about 44C — if incubated at these temperatures the bacteria will make itself known very quickly (within about 24 hours). Oh and if you don’t want to find out how dirty your water is, you can also make yogurt instead. Check out a short demonstration of the incubator after the break.
Filed under: cooking hacks  |
| 12:00 pm | Using The Wii U Controller With Everything
It’s been just a bit over a year since the Wii U was released along with the extremely impressive Wii U controller. With a D-pad, analog sticks, accelerometer, gyroscope, magnetometer, camera and 6.2 inch touchscreen, this controller is ripe for a million and one projects ranging from FPV quadcopters and robots to things we can’t even think of yet. At this year’s Chaos Communication Congress, [booto], [delroth], and [shuffle2] demonstrated how they cracked open the Wii U controller’s encryption allowing for Wii U controller ‘emulation’ and giving us full documentation on how the whole thing works. The guys started on their reverse engineering journey by dumping all the flash chips found on the controller’s board. In those binary blobs, they found Nintendo used a truly ingenious way of obfuscating the WiFi keys used to connect the controller to the Wii: rotate left by three. To be fair to Nintendo engineers, it was secure until someone figured it out. Connecting the controller to a PC over WiFi is only half the battle, though. Initial information from the Wii U launch suggested Nintendo used Miracast for all the I/O between the controller and the console. This isn’t the case; instead the video, audio, camera, and button input are non-standard but very simple protocols. The hardest to break into was the video display for the touchscreen, but the guys discovered it’s pretty much H.264. After getting around some Nintendo weirdness, it’s possible to display video on the controller. The guys have put together a small, extremely alpha library that comes with all the demos, documentation, and reverse engineering information. There’s a large wish list of what this library should include, but now that the information is public, it might be the time to pick up a Wii U. Video of the talk below, here’s the presentation slides, and a demo of emulating a Wii U game pad on a PC.
Filed under: nintendo wii hacks  |
| 9:01 am | Electric Snow Scooter
[Dane] decided he wanted to make a rather large electric scooter, capable of taking him through even the most inclement weather — that’s right, even snow. Well, after about 18 months of stop and go work it is finally complete — for now. It features an impressive 7kW brushless 3-phase motor, a massive lithium ion battery pack and more custom parts then you could shake a stick at! The frame started out as one of those big push scooters from the 80′s, in fact, it is the same as the one shown in Macklemore’s Thrift Shop video (pic)! But since then it has had many a modification done to it — it looks as though the front end is the only part that wasn’t touched! He’s got an incredible build log his website, so if you want to build your own (you will once you’ve seen the video after the break), it’s a great starting point.
Filed under: transportation hacks  |
| 6:01 am | The Crowbox Turns Crows into a Cash Machine
[Joshua Klein] is intrigued by crows, and in particular, their intelligence. He’s devised a system that may be able to train wild crows into performing useful tasks, such as exchanging lost coins for treats. The idea started as a random conversation at a cocktail party almost 10 years ago, and now has become a reality. In fact, we actually mentioned this project’s beginnings 5 years ago! So far they have succeeded in training captive crows to exchange lost coins using the Crowbox to receive treats. The end goal however is to teach wild crows the same thing — once this is proven, it could be extended to other tasks, like search and rescue, sorting through discarded electronics, or even garbage collection! The project is opensource, and the Arduino driven Crowbox is looking for alpha-testers to help experiment with wild crows from different locals. The current community is rather small, so if you’re interested in the concept, please check it out. We’ve attached [Joshua's] excellent TED talk on the intelligence of crows after the break — if you’re not fascinated by crows yet, you will be!
http://www.youtube.com/watch?v=bXQAgzfwu Now while the end goal isn’t to have a murder of crows collecting money for you… actually that would be pretty cool. Filed under: Arduino Hacks  |
| 3:00 am | Fubarino Contest: Splash Screen On System Reset
Here’s a Fubarino contest entry for all those homebrew computer nuts out there. [Danjovic] modified an NTSC/PAL display adapter to show an ASCII version of the Hackaday logo when his board first boots up. The build is based on [Daryl Rictor]‘s Video Display Adapter intended for use with homebrew computers, microprocessor projects, and any other minimalist digital setup that needs an NTSC or PAL video display. It’s a surprisingly simple circuit, made of a few logic ICs and an ATmega8. [Danjovic] modified this video display adapter with an easter egg: if one pin on the ATmega8 is shorted when the board is powered on, a neat Hackaday splash screen is displayed for several seconds before falling back to the stock display of a blinking cursor. [Dnajovic] converted the ASCII Hackaday logo with the help of a short Python script and loaded it onto the AVR with a small firmware change. Video of the boot screen in action below. This is an entry in the Fubarino Contest for a chance at one of the 20 Fubarino SD boards which Microchip has put up as prizes!
Filed under: classic hacks, contests  |
| 12:01 am | Hackaday Links: December 29, 2013
Ikea picture frame plus old laptop equals a roll-your-own digital picture frame which [Victor] built. It runs Ubuntu and is more powerful and extensible than anything you could purchase outright. Our friend [HowToLou] sure loves the FlowRider. So much so that he’s trying to figure out how to make them less expensive to operate. He put together an example of how he thinks a standing wave can be created that follows the rider as they move along the surfing area. [Garrett] released an Arduino library that offers threading, debugging, and error handling. The usertools package can be downloaded from his Github repository. There’s only one way to gauge your Christmas cheer — hook yourself up to the XMeter built by [Geoff]. He’s the same guy who built a breathalyzer a couple of years back. It flashes images of holiday activities on a television while measuring galvanic response using a couple of DIY probes. And finally, play around with a virtual x86 system. [Fabian Hemmer] wrote the incredibly full-featured virtual machine in JavaScript. You can get your hands on the code via his GitHub repo. [Thanks Martin] Filed under: Hackaday Columns, Hackaday links  |
| Sunday, December 29th, 2013 | |
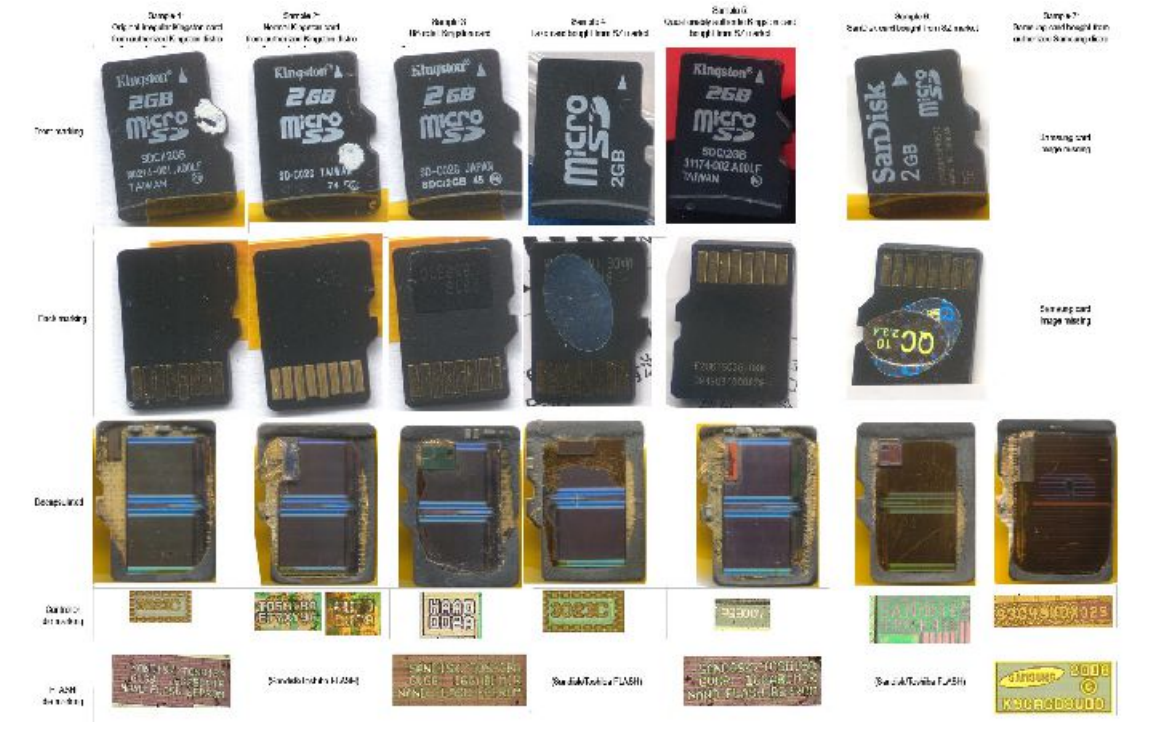
| 9:00 pm | Hacking SD Card & Flash Memory Controllers
We hope that some of our readers are currently at this year’s Chaos Communication Congress (schedule can be found here and live streams here), as many interesting talks are happening. One of them addressed hacking the memory controllers embedded in all memory cards that you may have. As memory storage density increases, it’s more likely that some sectors inside the embedded flash are defective. Therefore, all manufacturers add a small microcontroller to their cards (along with extra memory) to invisibly ‘replace’ the defective sectors to the operating system. [Bunnie] and [xobs] went around buying many different microSD cards in order to find a hackable one. In their talk at 30C3 (slides here), they reported their findings on a particular microcontroller brand, Appotech, and its AX211/AX215. By reverse engineering the firmware code they found online, they discovered a simple “knock” sequence transmitted over manufacturer-reserved commands that dropped the controller into a firmware loading mode. From there, they were able to reverse engineer most of the 8051 microcontroller function-specific registers, allowing them to develop novel applications for it. Some of the initial work was done using a FPGA/i.MX6-based platform that the team developed named Novena, which we hope may be available for purchase some day. It was, among others, used to simulate the FLASH memory chip that the team had previously removed. A video of the talk is embedded below.
Filed under: hardware  |
| 6:01 pm | I am NXT 3-Point Bend Tester. Please Insert Girder.
[Rdsprm] built this from the Mindstorms education base set (9797) and the education resource set (9648). Each contestant endures a 5-test battery and should produce the same result each time. The motor in the foreground sets the testing length of the beam, and the second motor pulls the spring down using a gearbox and chain. This method of deflection testing is unconventional, as [Rdsprm] explains. Usually, the beam is loaded incrementally, with deflection measured at each loading state. Here, the beam is loaded continuously. Vertical deflection is measured with a light sensor that reads a bar code scale on the beam as it passes by. The spring position is calculated and used to determine the applied force. [Rdsprm] analysed the fluctuation in GNU Octave and has graphs of the light sensor readings and force-deflection. No beams to bend with your Mindstorms? You could make this Ruzzle player instead.
[via reddit] Filed under: misc hacks, robots hacks, toy hacks  |
| 3:00 pm | Fubarino Contest: Hackaday On An RC Heli
[SF Tester] (his real name, honestly, with a brother who does QA for Blizzard) recently picked up a Blade SR remote control helicopter. Compared to the cheap coaxial helicopters you can pick up from eBay or Amazon for $30, this heli is a huge step up, but it does have one weakness – it comes with its own transmitter, and binding it to [Tester]‘s shiny new DX9 transmitter is a pain. The initial attempt at getting the proper values from the stock transmitter into his big-boy transmitter originally consisted of taking the stock transmitter, some servos, attaching them to homebrew protractors, and reading out the values of each axis manually. That’s a brute-force method of improving his new toy, so [Tester] sought out a better method. The solution came via Arduino’s pulseIn() command. By connecting the stock receiver to an Arduino, [Tester] was able to precisely read the values coming from the stock transmitter and import them into his very fancy Spektrum DX9 transmitter. Every Fubarino contest entry needs an easter egg, so when the value of the pulses coming from the stock transmitter is exactly 1337 microseconds, the Arduino spits out Hackaday’s URL to the serial console. Cleverly hidden, and a great way to improve an awesome heli. We can’t ask much more than that. There’s no direct link for this, but you can literally see the code in the image after the break. This is an entry in the Fubarino Contest for a chance at one of the 20 Fubarino SD boards which Microchip has put up as prizes!
Filed under: contests  |
| 12:01 pm | Project Lucidity Wants YOU!
Do you lucid dream? Do you want to? [Dinesh Seemakurty] has just started something called Project Lucidity, which is the first(?) open source, developer friendly, fully featured, lucid dreaming sleep mask. And he’s looking for hackers to help! We’ve covered lots of projects on lucid dreaming before, like making your own homemade lucid dreaming goggles, or modifying a commercial EEG headset for lucid dreaming. We also can’t forget the LucidScribe project either, the one that seeks to communicate from within dream state! Anyway, what’s different about Project Lucidity? Well, first of all, it’s open source. Second of all, it’s based on an ATMEGA328P, meaning it’s fully compatible with the Arduino IDE. It looks like a great start, and [Dinesh] is planning on taking everything open source very soon — but before then he wants you to try it out! If this sounds like a project you want to get behind and help develop, check out his site and sign up. Or ask away in the comments section! Filed under: Arduino Hacks  |
| 9:01 am | Fubarino Contest: NTP Clock
[Toni] has been playing around with NTP, the Network Time Protocol. This allows the alarm clock build to keep very accurate time by synchronizing with an NTP server on the Internet. The project serves as a bedside alarm clock. When it comes time to wake in the morning an alarm sounds and the screen switches from using a blue backlight to using a red one. This is show in the video below, but you’ll want to turn down your speakers before watching it; the alarm sound will have no problem waking you up in the morning. After the unwelcomed jolt you’ll get a glimpse at the Easter Egg which reminds you to check for new posts on Hackaday. Afraid of ending up with a steaming pile of slag instead of a server [Toni] asked us to host the project files. You can find the first-hand description of the project and a link to the code below. This is an entry in the Fubarino Contest for a chance at one of the 20 Fubarino SD boards which Microchip has put up as prizes!
Filed under: contests  |
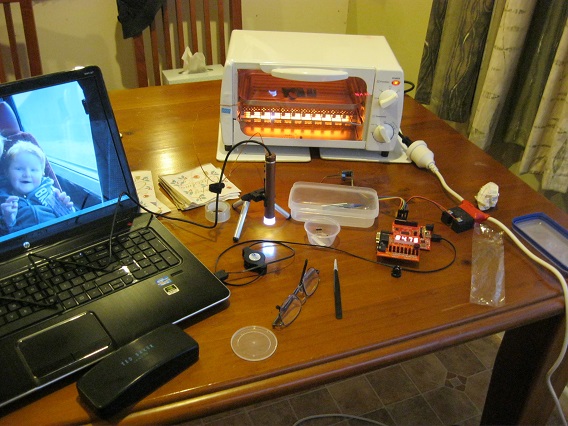
| 6:01 am | A FPGA Controlled Reflow Oven
For Christmas, [Hamster]‘s wife gave him a mini-oven. Later that day, he tore it apart and built this FPGA controlled reflow oven. We’ve seen plenty of reflow oven builds in the past. Most of those projects use a microcontroller to do closed loop control, sensing the temperature and toggling the heating element to hit a set point. This build uses the Papilo One FPGA development board as a controller. It implements a state machine that meets the reflow profile of the solder paste, ensuring SMD components are soldered properly. The oven uses a MAX31855 to read temperature from a thermocouple. This device provides amplification, cold junction compensation, and analog to digital conversion which spits out the temperature over SPI. To control the heater, a 40A solid state relay is used. The VHDL code that drives this oven is linked in the writeup, and has some interesting bits for those looking to experiment with FPGAs. It includes an SPI interface, display driver, and the temperature state machine logic. Filed under: tool hacks  |
| 3:01 am | Fubarino Contest: Micro Voltmeter
This collection of hardware is a diy voltmeter. It can measure up to 17V with 1 microvolt resolution while taking seven samples per second. The LTC2400 ADC board is used to make the measurements, with the Arduino processing the output and taking care of the display and user input buttons. In addition to showing off what the thing can do in the video after the break, [Luis] gives us a look at the easter egg he added to the project. When you have a source that is very precisely 12V, the meter will read out Hackaday.com! Incidentally the display used in this hack is one we’ve seen before. Obviously this is a convenient way to add interactive controls to your projects. This is an entry in the Fubarino Contest for a chance at one of the 20 Fubarino SD boards which Microchip has put up as prizes!
Filed under: contests, tool hacks  |


 [Roballoba] decided to


 Learning with visuals can be very helpful. Learning with models made from NXT Mindstorms is just plain awesome, as [Rdsprm] demonstrates with this