[Most Recent Entries] [Calendar View] [Friends]
Below are 20 journal entries, after skipping by the 20 most recent ones recorded in
Hack a Day's LiveJournal:
- Splash Screen On System Reset
- Micro Voltmeter
- Custom Mech Warrior Online Controller
- Bluetooth Control For Pc Psu
- Oscilloscope Clock
- Fpga Pong
- Hackaday In Your Soldering Iron
- A Sculpted Room With Leds
- A Really Really Old Plotter
- Single Pcb Synth
- The Problem Of Being Very Good At Foosball
- Minecraft Zelda Arduinos And Hackaday
- Persistence Of Vision Clock
- A Dutch Word Clock
- Led Matrix Game Console
- Game Boy Printer
- Battery Capacity Tester
- A Shifter With An Easter Egg
- Vfd Clock
- Morse Code Transmitter
| Friday, January 3rd, 2014 | |
| 6:00 am | Spoofing Pokemon Trades
[Adan] had an old Game Boy sitting around, and without anything better to do decided to investigate the link cable protocol with a microcontroller. He had a Stellaris Launchpad for the task, but initially had no project in mind. What he came up for this adventure in serial protocols is a first gen Pokemon trade spoofer that allows him to obtain pokemon without having two Game Boys, or for the weird ones out there, “friends.” The Game Boy link protocol is extremely well documented, so getting data from the Game Boy to the Launchpad was as simple as a soldering up an old link cable connector to a piece of perf board. After figuring out the electronics, [Adan] looked at what happened when two Pokemon games tried to trade pokemon. When two Game Boys are linked, there are two in-game options: trade or battle. Looking at the data coming after the ‘trade’ option, [Adan] found something that could possibly be the data structure of the Pokemon being sent. He reverse-engineered this all by himself before discovering this is also well documented. Bringing everything together, [Adan] figured out how to trade non-existent Pokemon with a small dev board. Right now he’s only transmitting Pokemon that are hard-coded on the Launchpad, but it’s very possible to transmit the Pokemon values in real-time over USB. Thanks [Dan] for sending this in, and no, we don’t know what’s up with the influx of Pokemon posts over the last week. Video of the spoof below.
Filed under: nintendo gameboy hacks  |
| 3:00 am | Gesture Based Security Lock
A team of students from Cornell University are looking into alternative ways of creating a security system that can be locked or unlocked by using physical gestures in an enclosed space. It is the final year project for [Ankur], [Darshan] and [Saisrinivasan] in their MEng of Electrical and Computer Engineering. The system prototype is capable of recording a gesture and then comparing the gesture with future gestures to lock or unlock the system. Consider it like a secret handshake to get into the office! To analyze the gesture they are using four SparkFun proximity sensors setup in a linear array to sense the distance a hand is moved. An ATMega1284P is used to convert the analog sensor signal to digital for further processing. The project is extremely well documented, as it appears to be the final report for the project. A short video after the break shows off the prototype and gives a good explanation of how the system works.
Filed under: security hacks  |
| 12:00 am | Un-crapifying a Car Stereo
[Noah Farrington] has just accomplished a major milestone in his life, purchasing his first car! A glorious 2001 Ford Focus wagon. While it may be a fully loaded luxury vehicle, it is missing one thing poor [Noah] can’t live without. An aux-in port. He had a few options for rectifying the situation. Live with it as is, hack the strange Ford media protocol out of the back, or fool the CD player into playing his input. Naturally he chose the third option. His first challenge was removing the deck from the car. People told him he’d have to buy fancy stereo removal tools — he made do with tent pegs and coat hangers. Using the same method as described in a past aux-in hack, he identified the audio in leads on the CD player’s ribbon cable. By carefully soldering in his own aux-in plug, he’s almost ready for business! Unfortunately, the CD player also needs to think that it is on for it to properly output the audio. [Noah] chose the simple solution — record a silent CD to always leave in the deck. Stick around after the break to see it in action.
He might not be driving a classic 1974 Pacer, but at least now he can rock out to the digitally remastered Bohemian Rhapsody off of his phone! Filed under: digital audio hacks  |
| Thursday, January 2nd, 2014 | |
| 9:00 pm | Controlling Ten Thousand RGB LEDs
[Sprite] figured there was one device on the current lot of ARM/Linux boards that provides the extremely precise timing required to drive a large array of WS2812 LEDs: the video interface. Even though the video interface on these boards is digital, it’s possible to turn the 16-bit LCD interface on an oLinuXino Nano into something that simply spits out digital values very fast with a consistent timing. Just what a huge array of RGB pixels needs. Using a Linux board to drive RGB pixels using the video output meant [Sprite_tm] needed video output. He’s running the latest Linux kernel, so he didn’t have the drivers to enable the video hardware. Not a problem for [Sprite], as he can just add a few files to define the 16-bit LCD interface and add the proper display mode. [Sprite_tm] already taken an oscilloscope to his board while simulating 16 strips of 600 LEDs, and was able to get a frame rate of 30 fps. That’s nearly 10,000 LEDs controlled by a single €22/$30USD board. Now the only obstacle for building a huge LED display is actually buying the RGB LED strips. A little back-of-the-envelope math tells us a 640×480 display would be about $50,000 in LEDs alone. Anyone know where we can get these LED strips cheap?
Filed under: ARM, led hacks  |
| 6:01 pm | Fail of the Week: AFSK Build Doomed by Rail Noise
[Scott] and his buddies were having some fun with their handheld transmitters one day when they decided it was time to build some add-on hardware that could transmit and receive location data. They set their sights on a set of Audio Frequency Shift Keying units that could each encoded and decipher location from the counterpart. The build got off to an easy start, centering around an Arduino board with a GPS module for capturing precise location data. Next it was time to implement AFSK. On the transmitting side this was done by bit banging the output pins. After a look at the resulting signals on an oscilloscope the team was able to tune the firmware for a pretty tight 1200 and 2200 Hz output. But trouble was brewing on the decoding side of the equation. The first decoding attempt used the FreqMeasure library written by [Paul Stoffregen]. After no success they moved to a hardware solution in the form of the XR-2211 FSK Demodulator chip. It should have been simple, feed it the signals and read the digital output pins to capture the desired data. This is the point at which you need to click the project link at the top to soak in all of the gory details. Long story short, a noisy power rail was causing sporadic performance of this chip. By the time this issue was discovered interest had waned and the project was ditched as a failure. Was there a quick fix that could have salvaged it such as adding a filtering circuit for that chip? Let us know how you would get this back on track by leaving a comment below. [Thanks Lewin]
Filed under: Hackaday Columns, radio hacks  |
| 3:01 pm | QtLedTest – Software to Evaluate OLED Displays
A few days ago we featured the USBPass, an offline password keeper made with very few components. At the end of our write-up we mentioned that [Josh] was already working on another version of his hardware, which involved adding an OLED screen to the platform. To help him pick one he created QtLedTest, a Qt-based tool that simulates different OLED displays and GUI layouts for them. Internally QtLedTest is composed of QLedMatrix (a widget that simulates LED matrices), an SSD1306 OLED controller simulator, a simple graphics drawing library and some functions to draw text on the simulated screen. [Josh] used Fontbuilder together with a program he made in order to convert fonts he had found on the internet to C files. All the source code [Josh] made can be found on Github and should be updated in coming weeks as the final program is a bit slow to render the simulated screens. Filed under: software hacks  |
| 12:01 pm | Once, Twice, Three Times a Nixie
Try as he might, [Localroger] can’t seem to throw away a certain board that started life in one of the first digital industrial scales, the NCI DigiFlex model 5775. He recently gave it a third career as a nixie clock with an alarm. [Localroger] says the board dates to about 1975. It’s all TTL, no microprocessor anywhere. He was headed to the Dumpster with it in the mid-1980s, but realized that he could hack it into something useful. Since the display wasn’t multiplexed, it would be fairly easy. He used it as a BCD tester for about 10 years until the method fell out of fashion. After a decade on the shelf, [Localroger] started off for the Dumpster once more with the board. The nixie tube display cried out for another chance to glow, so he decided to repurpose it into a remote-controlled bedside clock with an alarm. He installed a Parallax Propeller Protoboard with headers for easy removal and subsequent servicing of the 5775 board. He added a few things to the protoboard: a piezo element for the alarm, a SparkFun RTC module, an IR receiver, and vertically-oriented header so the PropPlug can be plugged in from the top. But that’s not all. [Localroger] designed a custom melamine-finished MDF enclosure and laser cut it, giving the edges a nice contrast. It’s so tough, he can put his ceramic lamp on top of it to save space on the nightstand. Nixie tubes are becoming more scarce all the time. If you can’t find any, we humbly suggest rolling your own. [Thanks Localroger!] Filed under: clock hacks, Microcontrollers, misc hacks  |
| 9:01 am | Glowing Balloon Blimps
Looking for a neat decoration for your next soirée? How about floating fleet of glowing balloon blimps? [Kensho Miyoshi] — an avid reader of Hack a Day — needed an art installation project in Tokyo, he came up with these clever glowing balloon blimps. They feature a mini gondola hanging from the bottom of a regular balloon which holds a small motor with a propeller, an Arduino Pro Mini, LEDs, an ultrasonic sensor and of course, a battery. They float up to a certain height with the LEDs shining bright, and when the ultrasonic sensor trips, it all turns off and the balloon sinks gently back to the ground. The process repeats, and in a completely dark room it looks like a series of glowing bubbles forming and floating away, again and again. To see the floaty, glowy, balloon blimps, stick around for a video after the break.
We’ve also covered a similar project recently on how to make a $13 remote-controlled balloon blimp using those micro-scale RC cars, a great project for young hackers. Filed under: toy hacks  |
| 6:00 am | Easy Multi-Touch Table
[2bigbros] put up an Instructable on his multi-touch table build. It’s a nice setup, using the typical frustrated total internal reflection method for touch sensing. Tinkerman’s Method was used for the screen itself, which involves rolling silicon onto vellum with a paint roller to improve the bond. [2bigbros] then built a nice aluminum and wooden frame for the whole thing. He’s light on some details, but most people with a basic understanding and Google will be able to figure it out. This is a very accessible project for most builders. If you’re interested in getting into it, there are plenty of projects to reference. We previously covered the basics, as well as a more involved build. We’ve even seen an interactive tower defense game using multi-touch. If you decide to build one of your own, don’t forget the excellent resource at TUIO for finding frameworks and example implementations.
[via Instructables] Filed under: hardware, home entertainment hacks  |
| 3:00 am | Reverse Engineering HitClips
After a quick review of the Hackaday viewer demographics, we need to say the late 90s were weird. Even portable audio players were downright bizarre: MP3 players existed, but you loaded up your songs (all eight of them) over your PC’s parallel port. While helping a cousin move some furniture, [Ch00f] found a huge collection of one of the oddest music formats ever: HitClips, a tiny plastic encapsulated bit of circuitry that stores 60 seconds of terrible-sounding mono audio. Yes, this was a thing, but so was the pet rock. With no HitClips player, [Ch00f] decided he would take a swing at reverse engineering these tiny, tinny songs. After taking apart the plastic enclosure, [Ch00f] found a very simple circuit: a few resistors, a cap, and an epoxy blob that enclosed an die with the musical data. On the back of the clip, there are eight pads for connecting to the player. With nothing to go on, [Ch00f] started poking around and found connecting one of these pins to ground caused circuit to draw 300uA of current for about 60 seconds – the same length of time as the recorded sample. [Ch00f] originally thought the HitClip would provide audio data over an SPI or other digital protocol. What he found was much more interesting: two of the pins on the HitClip correspond to the push and pull FETs of a class D amplifier. The audio on the HitClip is digital audio, but it’s encoded so it can directly drive an analog circuit. Pretty clever engineering for a happy meal toy, if you ask us. After dumping this data with a logic analyzer, [Ch00f] turned all the values in to .WAV file. It was, amazingly, music. A little refinement to the process to nail down the timing resulted in a 60-second clip seen (heard?) after the break. Since [Ch00f] doesn’t want to spend $40 on eBay for a vintage HitClips player, he’s right about at the limit of what he can reverse engineer out of these cheap, crappy music chips. He has put up all his documentation, though, so if you’re up for improving on [Ch00f]‘s methods, have a go.
Filed under: classic hacks  |
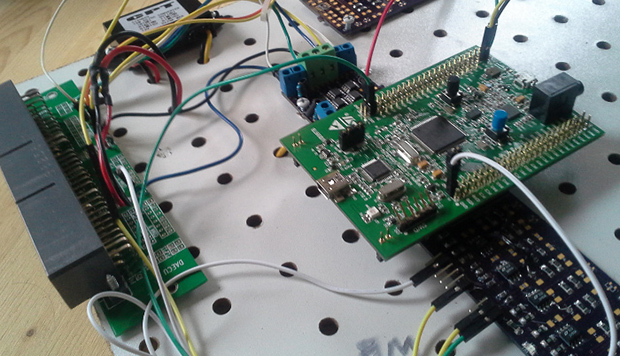
| 12:00 am | Building An Engine Control Unit With The STM32F4
If you’re looking to soup up your whip, the first place you’ll probably look is the engine control unit. This computer shoved in the engine compartment controls just about every aspect of your car’s performance, from the air/fuel ratio, the ignition timing, and the valve controls. Upgrading the ECU usually means flashing new firmware on the device, but [Andrey] is taking it one step further: he’s building his own ECU using the STM32F4 Discovery dev board. [Andrey]‘s ride is a 1996 Ford Aspire, but while he was developing his open source ECU, he wanted to be able to drive his car. No problem, as going down to the junkyard, picking up a spare, and reverse engineering that was a cheap and easy way to do some development. After powering this spare ECU with an ATX supply, [Andrey] was able to figure out a circuit to get sensor input to his microcontroller and having his dev board control the fuel injector. With a few additional bits of hardware [Andrey] has his open ECU controlling the fuel injection, ignition, fuel pump, and idle air valve solenoid. Not a bad replacement for something that took Ford engineers thousands of man hours to create. [Andrey]‘s ECU actually works, too. In the video below, you can see him driving around a snow-covered waste with his DIY ECU controlling all aspects of the engine. If the engine sounds a little rough, it’s because a wire came loose and he was only using two cylinders. A bit of hot glue will fix that, though.
Filed under: ARM, transportation hacks  |
| Wednesday, January 1st, 2014 | |
| 9:00 pm | Gotta Catch ‘Em All, With An Arduino
For every pokemon you encounter on your adventure to become the world’s greatest trainer, you have about a 1 in 8000 chance of that pokemon being ‘shiny’, or a different color than normal. Put an uncommon event in any video game, and of course a few people will take that feature to the limits of practicality: [dekuNukem] created the Poke-O-Matic, a microcontroller-powered device that breeds and captures shiny pokemon. We’ve seen [dekuNukem]‘s setup for automatically catching shiny pokemon before, but the previous version was extremely limited. It only worked with a fishing rod, so unless you want a ton of shiny Magikarp the earlier setup wasn’t extremely useful. This version uses two microcontrollers – an Arduino Micro and a Teensy 3.0 – to greatly expand upon the previous build. Now, instead of just fishing, [dekuNukem]‘s project can automatically hatch eggs, search patches of grass for shiny pokemon, and also automatically naming these new shiny pokemon and depositing them in the in-game pokemon storage system. The new and improved version works a lot like the older fishing-only automated pokemon finder; a few wires soldered on to the button contacts control the game. The Teensy 3.0 handles the data logging of all the captured pokemon with an SD card and RTC. What did [dekuNukem] end up with for all his effort? A lot of shiny pokemon. More than enough to build a great team made entirely out of shinies. Video below, with all the code available through a link in the description.
Filed under: Arduino Hacks, nintendo ds hacks  |
| 6:00 pm | Electronic Phenakistoscope!
Looking for a clever way to build a Phenakistoscope? Maybe you’re more familiar with its other names; Fantoscope, Phantasmascope, or perhaps its close cousin the Zoetrope? If you’re still scratching your head, that’s okay — they have really weird names. What we’re referring to here is a type of optical illusion that mimics movement by showing a series of still images at an offset interval — this can be achieved by looking through slots, strobing a light (like in this case) or even by the use of mirrors. This particular Phenakistoscope is a very simple but clever design that makes use of a recycled stepper motor from a printer, a CD as the animation disk, a strip of LED lighting, a few potentiometers and an Arduino to control the strobe. It works by synchronizing the strobe frequency with the motor rotation, resulting in the image in motion effect. Stick around after the break for a full gallery of the build and a demonstration video.
And of course, to see it in action: We also covered a great 3D printed Zoetrope a while ago that brought a bit of the third dimension into the animation! Filed under: led hacks  |
| 3:01 pm | USBPass – a Mooltipass-like Project
In our Developed on Hackaday series some readers may recall a sentence we wrote: “if one’s idea is not yet in the market, it’s either completely stupid or people are already working on it”. Well, [Josh] casually mentioned that he was also working on an offline password keeper after having recently subscribed to our google group. Similarly to the Hackaday-developed platform, the USBPass is connected to a computer via USB and is detected as an HID keyboard. As you can see in the picture shown above, it uses very few components: an ATMega32U2, a USB connector, three buttons and a few passives chips. A total of 20 passwords can be stored in the microcontroller’s memory, which can be ‘typed’ by the platform using the push buttons. The USBPass firmware is based around the LUFA USB stack, to which [Josh] added HID report functionality to allow data transfer from his desktop application. The latter uses the Linux/Windows/OS X HID API library so bringing his software to other operating systems can be done in no time. All the project resources can be found on GitHub, while [Josh] is currently working on a B revision which will include an OLED screen. Filed under: hardware, peripherals hacks  |
| 12:01 pm | Wireless Power Transfer for Quadrotors
Quadrotors are great, but what kind of range can you get on them, really? What if you could charge them up just by flying over high voltage power lines, by or temporarily hovering by a charging station? That’s just what [Dr. Carrick Detweiler] wrote a paper about! (Caution: PDF) The paper discusses the method of wireless power transfer via magnetic resonance, which, depending on the scale, can transfer power at medium distances (~1 meter). This outperforms inductive coupling which requires a much closer proximity (~1-2 centimeters) for power to transfer. It does still require a certain amount of accuracy, but as we all know, quadrotors have no problem with even the most complex aerodynamic feats! There is an excellent demonstration video of a small scale wireless quadrotor prototype after the break.
Curious about wireless power transfer? We also covered a great article about the theory behind evanescent wave coupling a few years ago! [Via Hizook] Filed under: toy hacks  |
| 3:01 am | The Art of Box Making
[Darcy] has a bit of a love affair with cardboard. What started out as a simple way to mail things cheaper by making custom sized boxes has turned into the full-blown art of box making. He originally started by making the boxes by hand, but after he got suitably adept at it, he quickly refined his craft by adding in some technology. He now designs the boxes in SketchUp and then uses a home-made CNC router to cut and score the cardboard into even fancier styles. His blog has a whole slew of his cardboard box designs and it’s actually pretty cool to see what he’s come up with. He also has a bunch of tips for making your own, so if you’re one of those lucky hackers who can sell the things they make, it’s definitely worth a look! If you’re not selling anything perhaps a cardboard lamp shade is more for you? To see a video example of one of his CNC cut boxes, stick around after the break. Now all he needs to do is design an automatic box folding machine!
CAUTION: LOUD VIDEO Filed under: cnc hacks  |
| 12:00 am | An Arduino With Better Speech Recognition Than Siri
The lowly Arduino, an 8-bit AVR microcontroller with a pitiful amount of RAM, terribly small Flash storage space, and effectively no peripherals to speak of, has better speech recognition capabilities than your Android or iDevice. Eighty percent accuracy, compared to Siri’s sixty.Here’s the video to prove it. This uSpeech library created by [Arjo Chakravarty] There is one caveat for the uSpeech library: it will only respond to predefined phrases and not normal speech. Still, that’s an extremely impressive accomplishment for a simple microcontroller. This isn’t the first time we’ve seen [Arjo]‘s uSpeech library, but it is the first time we’ve seen it in action. When this was posted months and months ago, [Arjo] was behind the Great Firewall of China and couldn’t post a proper demo. Since this the uSpeech library is a spectacular achievement we asked for a few videos showing off a few applications. No one made the effort, so [Arjo] decided to make use of his new VPN and show off his work to the world. Video below.
Filed under: Arduino Hacks, Software Development  |
| Tuesday, December 31st, 2013 | |
| 9:01 pm | Fubarino Contest Winners
It is with great pleasure that I announce the winners of the Fubarino Contest (alphabetical order): Brian, Daniel, Dave, Dominic, Eric, Gerben, James, Joel, Joseph, Laurens, Luis, Mats, Mike, Nathanael, Pete, Peter, Sebastian, Taciuc, Vojtěch, and Wes. They rose to the challenge and added our URL as an Easter Egg in their microcontroller project. Their hacks were chosen for their creativity, as well as completeness of presentation. Congratulations! Links to all twenty project features are after the break in reverse order in which they were originally published. To see all the entries hit up the contest tag. We also want to take a moment to thank Microchip Technology Inc. They not only put up twenty Fubarino SD boards as prizes, they are also covering the cost of shipping to each winner. Many thanks! We thought it was interesting that the twenty winners live in 11 different countries: Brazil, Canada, Czech Republic, Germany, Malaysia, Romania, South Africa, Spain, The Netherlands, UK, and the USA. Hackaday really is a global community! If you are one of the winners please leave your acceptance speech in the comments section. This is also a great place to leave feedback — if you didn’t submit an entry we want to know why!
Contest Winners:Filed under: contests, Featured  |
| 6:01 pm | Retrotechtacular: Wax On, Wax Off: How Records Are Made
In this 1942 tour of the RCA Victor plant in Camden, NJ, we see the complete record making process from the master cut production to the shipping of multiple 78RPM shellac pressings. The film centers around a recording of Strauss’ Blue Danube waltz as performed by the 1940s equivalent of studio musicians, the Victor Salon Orchestra. The master record starts life as a thin layer of molten wax poured on to a hot circular plate in a dust-free room. Bubbles and impurities are blow torched out, and the wax is left to cool under a steel dome. This perfect disc is carefully passed to the recording studio through a special slot, where it is laid carefully beneath the cutting stylus. Unlike today’s multi-track recording sessions, the master was cut from the performance of a complete band or orchestra all playing as they would in concert. The sound engineer was responsible for making fast changes on the fly to ensure sonic and groove width consistency. After cutting, the delicate wax undergoes several phases of electrolysis that form the metal master. It is bombarded first with pure gold and then twice with copper sulfate to build a sturdy disc. The copper ionization process also ensures high fidelity in the final product. Although mighty, this master won’t last long enough to make all the necessary pressings, so a mother matrix is made. This is a negative image of the master. The mother is formed by electrolytically bathing the master in nickel, and then adding a thin film of some indeterminate substance. Another copper bath, and mother emerges. As soon as possible, the master is separated and whisked away to the storage vault. Since a positive image is needed for pressing, a stamping matrix is made. Mother gets a nickel bath for durability, and then a copper bath to form the stamping matrix. Many stampers are created so that several records can be pressed at once. These images get a chromium plating to help them last through many pressings. The stampers are soldered to a rigid backing before getting their very precisely placed spindle hole drilled. This hole is centered by machine and checked through magnification of the grooves as the disc spins. Stampers are washed one last time to remove dust and given a final brushing off and polishing. These 78RPM records were made from the finest shellac from India, resin from the East Indies, and 18 other secret herbs and spices that are all heated and combined in a 3-story Banbury mixer. The resulting dough is rolled out into a sheet and cut into biscuits, which are square pieces slightly bigger than the final record. The biscuits are reheated on steam tables right before they are pressed. Label application is part of the pressing process, and both sides are pressed simultaneously. After this, the ragged edge is smoothed, and each record is tested by human ears. Finally, it is polished, sleeved, counted, boxed, and ready to be shipped to Woolworth’s, Wanamaker’s, or wherever. A few years after this film was made, the shift to 33RPM vinyl records began. The process really hasn’t changed much over the years. The master, the mother matrix, and the stamping matrix bathe in different chemicals now, and the end result is pressed into a vinyl biscuit rather than shellac.
[Thanks Mlseim] Retrotechtacular is a weekly column featuring hacks, technology, and kitsch from ages of yore. Help keep it fresh by sending in your ideas for future installments.
Filed under: Retrotechtacular  |
| 3:00 pm | Acoustic Wayfinder for the Visually Impaired
Ideally, technology is supposed to enhance our lives. [Shane and Eileen], two seniors at Cornell have found a great way to enhance the lives of visually impaired individuals with their acoustic wayfinding device. In brainstorming for their final project, [Shane and Eileen] were inspired by this Hackaday post about robots as viable replacements for guide dogs. They sought to provide wearable, hands-free guidance and detection of (primarily) indoor obstacles—namely chairs, benches, and other inanimate objects below eye level. The wayfinder comprises two systems working in tandem: a head-mounted navigation unit and a tactile sensor worn on the user’s finger. Both systems use Maxbotix LV-MaxSonar-EZ0 ultrasonic rangefinder modules to detect obstacles and vibrating mini-disc motors to provide haptic feedback at speeds proportionate to the user’s distance from an obstacle. The head unit uses two rangefinders and two vibrating motors. Together, the rangefinders have a field of view of about 120 degrees and are capable of detecting obstacles up to 6.45 meters away. The tactile sensor comprises one rangefinder and motor and is used in a manner similar to a Hoover cane. The user sweeps their hand to detect objects that would likely be out of the range of the head unit. Both parts are ergonomic and size-adjustable. At power up, [Shane and Eileen]‘s software performs a calibration of the tactile sensor to determine the distance threshold in conjunction with the user’s height. They’ve used an ATMega 1284 to drive the system, and handled real-time task scheduling between the two subsystems with the TinyRealTime kernel. A full demonstration video is embedded after the break.
[thanks Shane and Eileen] Filed under: Medical hacks, Microcontrollers, wearable hacks  |