[Most Recent Entries] [Calendar View] [Friends]
Below are 20 journal entries, after skipping by the 80 most recent ones recorded in
Hack a Day's LiveJournal:
- Gcodetools for Inkscape – Free, great for art generated on Inkscape. Somewhat limited in capability, and the documentation may take a little time to figure out.
- ESTLCam – Inexpensive at $35, and it has a good-looking interface. More of a 2D environment, and you can draw your parts on this program if you like.
- CAMBam – Reasonably priced at $149, with a very good free trial period. I primarily use this CAM program.
- MeshCAM – Really excellent looking user interface, and it has some neat features. Along with this polish, it is more expensive than some at $250. It’s geared more toward 3D users, so it wasn’t a great fit for my Draftsight-centric CAD style.
- Custom CAM routine - If you’re a programmer (or pretend to be), it’s possible that you could write your own Gcode generating script. I’ve linked to a post on my “pixel machining” Python routine if you’d like to see an example.
| Thursday, December 26th, 2013 | |
| 9:00 am | NeverWet on Electronics?
Does NeverWet work on electronics? The team over at Adafruit just had to find out — and to an extent, it does work! But wait, what’s NeverWet? It’s Rust-Oleum’s miracle water-repelling coating which is super hydrophobic. It actually works, and we’re kind of surprised we haven’t seen it used in a hack yet! Anyway, let’s start this hack with a quick disclaimer. NeverWet is not designed for waterproofing electronics. But when has that ever stopped the pursuit of science!? The experimenters chose a few electronic guinea pigs to test out NeverWet’s capabilities. An Arduino Micro, a FLORA LED broach, and a Raspberry Pi. Using the proper application method they coated the unlucky electronics with a few generous layers of the product. Using plain NYC tap water they tested each component. The FLORA LED broach (shown above) lasted underwater for about 4 hours before it died. The Arduino Micro fared similar, however the Wet Raspberry only booted once before losing connection to the SD card. For full details check out the full experiment or stick around after the break to see a video of the tests.
[via Reddit] Filed under: misc hacks  |
| 3:01 am | Christmas Tree Analyzes Your Tweets
It’s Christmas time. You have a string of 50 individually addressable RGB LEDs, what would you do? Well, [Barney] decided to try something different. He’s made a Christmas tree that reflects Twitter’s current sentiments about the holiday. Wait, what? We admit, it’s a kind of weird concept, but the software behind it is pretty cool. As it turns out Stanford University’s Natural Language Processing Group released the source code for their sentiment analyzer. Unlike a normal sentiment analyzer which assigns points to positive words and negative points for negative words, this one actually uses a deep learning model which builds up a representation of entire sentences based on their structure — only problem? It was designed and trained to analyze movie reviews, not Christmas tweets. Regardless, it still does the trick (kind of), but, it’s pretty slow. [Barney] has his fastest computer running four instances of the analyzer, which pulls Christmas tweets that have been sorted by the Twitter API — it then analyzes them, assigns the sentiment, and places them in a second queue. He’s using beanstalkd for the queuing and a Raspberry Pi to control the lights. The result is a pretty light display whose colors represent the sentiments of incoming tweets — it’s hard to say if it’s actually successful in reflecting the opinion of the tweets, but it’s a pretty cool concept. Stick around after the break to see the Christmas Tweet Analyzing Tree in action — say that 5 times fast!
Filed under: Holiday Hacks  |
| 12:01 am | More Lights for your Presents
Lights on the tree? Check. Presents under the tree? Check. Lights in the presents? Why not! If your gifts don’t look festive enough and you have a spare inductive charging system lying around the house—though, you could always build your own from scratch—you can brighten things up by installing a few LEDs in the packaging. The Instructable takes advantage of those new-fangled LED Christmas lights, one strand of which typically draws under 1A and requires around 5V, putting it in the ballpark for popular induction systems used to charge cell phones such as the Powermat. In this particular example, the strand ran off 3 AA batteries, or 4.5V, which meant stepping down the voltage either with a power regulator or, more conveniently, a simple diode in series. Some additional modifications to the packaging tidy up the installation, including carving out some of the cardboard to recess the receiver and securing everything with hot glue before wrapping it all in paper. You can see a quick demonstration video below.
Filed under: Holiday Hacks, led hacks  |
| Wednesday, December 25th, 2013 | |
| 9:01 pm | Serializing Dickens to LEDs
[ch00f] managed to capture some holiday spirit this year by translating all of A Christmas Carol to scrolling text. Dickens’s work has long since entered public domain, which led [ch00f] to wire up a GeekCatch programmable display from Amazon. It has a low refresh rate, which means videos look a bit goofy, but it’s perfectly acceptable for text. [ch00f] ditched the remote control and instead used the display’s serial connection to program in the novella. Unfortunately, he could not find any documentation for the serial protocol, but he was able to reverse engineer it with some freeware applications found online. It takes over six hours for the sign to spit out the entirety of A Christmas Carol, which easily surpassed the display’s limited text buffer. [ch00f] instead had to send text to the display one paragraph at a time via a custom Python script. This solution takes advantage of the sign’s fixed-width font to estimate the time it takes for each character to scroll by, then immediately feeds the sign a new line. Check out the blog post for a quick teardown of the display itself and for a detailed description of the protocol in case you decide to use this display for a project. Stick around for a video below!
Filed under: Holiday Hacks  |
| 6:01 pm | An Animated Elf
Halloween receives the bulk of the attention for installation-type hacks, but [Stephen's] animated elf hack-in-progress provides the perfect example of bringing the Christmas spirit to life. [Stephen] constructed both the background and the elf’s body from a scrap piece of plywood, drawing and painting everything by hand, and then secured the plywood with a simple 2×4 that serves as a stand. The bulk of the hack is rather simple, and reflects the longstanding technique of traditional cel animation: the non-moving portions are kept stationary and only the moving parts need to change. In this case, [Stephen's] shortcut is to insert a tablet as the elf’s face. The tablet is a BlackBerry PlayBook, which moves the eyes around and spouts off a few Santa-related quips while animating the mouth. [Stephen] encountered a problem with the PlayBook’s 5-minute screen timeout function, and had to design a custom application to prevent the tablet from entering sleep mode while it played through the animations. His future plans are to drill a hole through the plywood and expose the tablet’s light sensor to detect when someone walks by, then have the elf spring to life in response. You can see his progress so far in the video below.
Filed under: Holiday Hacks, tablet pcs hacks  |
| 3:01 pm | Spherebot: Decorating Xmas Baubles
The Spherebot is an open source machine capable of printing designs onto spherical objects, such as Xmas baubles! The design is based on the ever-popular Egg-Bot, which we have seen derived into many other useful printers such as the Mug Plotter, and the Ping Pong Printer. The Spherebot features two stepper motors, one servo motor for marker actuation, some cheap mounting hardware, and a whole bunch of 3D printed parts—all of which are available on Thingiverse. In this design they used a 3D printer controller board called the 3Drag by Open-Electronics, which is based on the ATmega2560 (the same microcontroller as the Arduino MEGA). The Spherebot doesn’t require all three axes or an extruder, so they only installed 2 out of the 4 stepper drivers on the board to save cost. Once you have it all built, it’s a simple matter of uploading your design into the free Spherebot-Host-GUI provided on GitHub. Stick around after the break to see just what it is capable of!
[via Dangerous Prototypes] Filed under: cnc hacks, Holiday Hacks  |
| 12:01 pm | CartoLucci: A Candle-Powered Christmas Card
If you’re looking for a last-minute Christmas present, you probably won’t have enough time to reproduce [Helmar's] candle-powered Christmas card. He’s been working on it for a few years now, since his first prototype in 2010. Though he pieced together the original card with parts lying around his workshop, the most recent iteration looks like it belongs on the shelf in a store. We last saw [Helmar's] work two years ago, when he shared his Full Color Laser TV. This project is a bit more compact: the circuitry was printed with conductive ink on the cardstock, and all the required components are held together by conductive adhesive. To power the electronics, he decided against a battery and instead chose to embed a solar cell on the inside of the card. Placing a lit candle inside the open card provides enough juice for the exterior of the card to shine. You can see a video of both the current and prototype versions of [Helmar's] cards after the break.
Filed under: Holiday Hacks  |
| 3:00 am | LED Matrix Mask Will Scare Up Holiday Cheer
[Davide] sent us this fun LED matrix mask he built using an ATMega8 and 74LS595N shift registers. Each of the eyes is an 8×8 LED matrix, and the mouth is made from two 8x8s. [Davide] used a ULN2803A Darlington transistor array to drive the matrices. When the user steps behind the mask, an IR sensor detects that a face is within range and activates the facial features. The code randomly runs the eye and mouth patterns. If the user starts speaking, a microphone element detects his voice and a separate speaking mouth pattern is executed. The mask body and stand are découpaged with pages from Dylan Dog comics. [Davide] says he built the mask years ago, but decided to submit it to the 2013 Inverart Art Fair in Milan. As you can probably imagine, the mask has been a big hit with the kids so far. Stick around to see [Davide]‘s Santa-fied demonstration after the jump. [Davide] didn’t give us any details on that sweet hat, unfortunately. If you require a better degree of protection or more LEDs, check out this LED helmet.
Filed under: led hacks, Microcontrollers  |
| 12:01 am | Direct, Wall-Mounted Storage with Lasers and Polymorph
We’re sure everyone could use some more storage and organization in their workshop. [Nixie] is no exception, though he also hates sacrificing tabletop space for boxes. His solution was to attach them to the wall directly by hacking together some brackets. This hack allowed him to hang everything without using internal screws which were a pain to get at if he need to removed the boxes from the wall to take with him. [Nixie] started by laser-cutting a negative pattern for a mounting bracket that would fit the dovetail rails already on the sides of the boxes. He then pressed a piece of polymorph into this mold, slid the bracket along the side of the box…and realized it wouldn’t work. The piece wiggled around too much because it did not sit firmly in the rail. Back at the drawing board, [Nixie] split the project into two steps. He cast the screw-hole portion of the bracket in its own separate mold, then cast the railing part of the bracket directly in the dovetail section of the box, providing him a much higher degree of accuracy. After joining the two pieces, [Nixie] had a sturdy support bracket that he duplicated and attached around the rest of the bins. Filed under: misc hacks, parts, tool hacks  |
| Tuesday, December 24th, 2013 | |
| 9:01 pm | Fubarino Contest: A Sculpted Room With LEDs
[Sisam] and [Mclien] are a father and son team that built this sculptural room with an organic looking built-in seating area and sculpted lamp shades. When you have a room that looks this cool, the only option you have is to fill it with RGB LEDs, and it just so happens their light controller has a great Hackaday Easter egg. The room lighting is provided by a Shifty VU shield, OctoBar LED controller, and a few of these RGB LED modules. All pretty standard for an RGB LED project, but where this contest submission really shines is the controller for all the room lights. It has three sliders for the red, green, and blue channels, beefy toggle switches for each light location, an LCD for showing the program mode, a rotary switch, and push buttons for cycling through stored setups. The Easter egg for this project comes into play whenever the color value of the lights is set to Hackaday green, #00c100. When that happens, the Hackaday URL is displayed on the controller’s display. Awesome work, and a really cool-looking room. We wouldn’t mind a tutorial on how you sculpted it, [Sisam]. This is an entry in the Fubarino Contest for a chance at one of the 20 Fubarino SD boards which Microchip has put up as prizes! Filed under: contests, led hacks  |
| 6:01 pm | Retrotechtacular: Submarine Cable Splicing is Serious Business
Really. As this wonderfully narrated talkie picture from 1939 will attest, keeping even one drop of water from penetrating undersea cables is of the utmost importance. How do they do it? Many, many layers of protection, including several of jute wrapping. The video centers on splicing a new cable to an existing one in the San Francisco Bay to bring the wonder of telephony to a man-made island created for the Golden Gate International Expo. The narrator makes these men out to be heroes, and when you see how much lead they came into contact with, you’ll understand what he means. Each of the 1,056 individually insulated wires must be spliced by hand. After that comes a boiling out process in which petrolatum is poured over the splice to remove all moisture. Then, a lead sleeve is pulled over the connections. Molten lead is poured over the sleeve and smoothed out by hand. At this point, the splice is tested. The sleeve is punctured and nitrogen gas is pumped in at 20psi. Then comes the most important step: the entire sleeve is painted with soap suds. Any gas that escapes will make telltale bubbles. Once they are satisfied with the integrity of the sheath, they wrap the whole thing in what appears to be lead cables and pound them into submission. Surely that would be enough, don’t you think? Nope. They weld the cables all around and then apply two coats of tar-treated jute wrapping, which retards saltwater corrosion considerably.
Retrotechtacular is a weekly column featuring hacks, technology, and kitsch from ages of yore. Help keep it fresh by sending in your ideas for future installments. Filed under: Hackaday Columns, Retrotechtacular  |
| 3:01 pm | Fubarino Contest: A Really, Really Old Plotter
Decades ago, [Vegipete] found an old drum plotter at a university used equipment sale. This plotter was old in the 80s, so like any great tinkerer, [Vegi] reverse engineered the plotter’s circuitry and got it working with his Apple ][. The years went by, dust accumulated, and in 2010 [Vegipete] found himself doing some work with linear acceleration on a PIC microcontroller. Remembering his old plotter, [Vegi] realized he could build an embedded version of his old Apple ][ circuit. He built a circuit that turned the plotter into something that can be controlled with an FTDI adapter. A small update to the code added the an Easter egg. When the Konami code is entered on the plotter’s buttons it responds in the spirit of our Fubarino contest. This is an entry in the Fubarino Contest for a chance at one of the 20 Fubarino SD boards which Microchip has put up as prizes!
Filed under: contests  |
| 12:01 pm | 3DMonstr Printer: 8 Cubic Feet Of Build Volume
So you’re looking at 3D printers, but the build volumes for the current offerings just aren’t where you’d like them to be. [Ben Reylblat] had the same problem and came up with the 3DMonstr, an enormous printer that has (in its biggest configuration) a two foot cubed build volume, four extruders, and the mechanical design to make everything work. Most of the ginormous 3D printers we’ve seen are basically upgraded versions of the common table-top sided models. This huge Ultimaker copy uses the same rods as its smaller cousin, and LeBigRap also uses woefully undersized parts. The 3DMonstr isn’t a copy of smaller machines, and instead uses very big motors for each axis, ball screws, and a proper welded frame. It’s highly doubtful anyone will call this printer a wobblebot. The 3DMonstr comes in three sizes: 12 inches cubed, 18 inches cubed, and 24 inches cubed, with options for two to four extruders. We caught up with the 3D Monstr team at the NYC Maker Faire, and from first impressions we have to say this printer is freakin’ huge and impeccably designed. Filed under: 3d Printer hacks, Crowd Funding  |
| 6:01 am | Fubarino Contest: Single PCB Synth
Here’s a musical entry for the Fubarino Contest that turned out to be rather delightful. First, [Mats] shows off his musical knowledge by using the notes H, A, and D to play the chord that unlocks the Easter eggs. What’s that you say? There’s no H on your keyboard? You’re wrong. In the German music tradition B natural is known as H. This is what allowed Bach to write a tune that spells his name. [Mats] is hacking on his PlingPlong synthesizer. The first Easter egg—which you can see in the clip after the break—launches with the H-A-D chord in the lower octave, spelling out our URL on the 7-segment displays. But we prefer the second egg, launched with the chord in the upper octave, which is shown above. It uses the 3×5 LED grid to scroll out the address; in this still image an H is displayed. This is an entry in the Fubarino Contest for a chance at one of the 20 Fubarino SD boards which Microchip has put up as prizes! Filed under: musical hacks  |
| 3:01 am | Sonar With Python and Conference Call Hardware
[Jason] just tipped us off about his recent experiment, in which he creates a sonar system using standard audio equipment and a custom Python program. In case some of our readers don’t already know it, Sonar is a technique that uses sound propagation to detect objects on or under the surface of the water. It is commonly used in submarines and boats for navigation. [Jason]‘s project uses active sonar, which consists in sending short audio bursts (chirps) and listening for echoes. The longer it takes for the echo to return, the further the object is. Though his proof of concept is not used underwater, that may change if he continues the project. The audio editing software Audacity was used to make a fast frequency changing chirp, along with PyAudio libraries for the main Python program. Exact time of arrival is detected by correlating the microphone output with the transmitted signal. Given that [Jason] uses audible frequencies, we think that the final result shown in the video embedded below is quite nice. Filed under: digital audio hacks, software hacks  |
| 12:01 am | Fubarino Contest: Network Nodes, Door Lock, and Smoker Controller
Here’s a round-up of three different Fubarino Contest entries; a video of each is available after the break. On the upper left are the beginnings of a network node monitoring system developed by [Stephane]. When the network checks the weather, it may determine that it’s far too harsh outside and time to go in to see what’s new on Hackaday. There’s only sparse information available on the hardware. Each node uses an ATtiny84 and an RFM12B—different sensors connected to each are used to build up the network’s data collection capabilities. In the lower left is [Brett's] Bluetooth door lock controller. The Arduino, a cheap Bluetooth module, and a relay board make up the base station which will eventually connect to an electronic lock. [Brett] uses a smart phone to punch in the access code, and entering “1337″ four times in a row unlocks the Easter egg, displaying our URL on the character LCD. Here’s the code repository for his project. To the right is the display for [Andy's] smoker controller used for cooking. He already had some hidden features on the controller used to calibrate the thermocouple. For the contest, he simply added an additional button to extend the original menu access method. This is an entry in the Fubarino Contest for a chance at one of the 20 Fubarino SD boards which Microchip has put up as prizes!
Network Nodes:
Door Lock:
Smoker Controller: Filed under: contests  |
| Monday, December 23rd, 2013 | |
| 9:00 pm | IR Theremin Speaks In Four Voices
At the end of every semester, we get a bunch of cool and well-documented student projects from Cornell’s ECE4760 class. [Scott] and [Alex]‘s infrared theremin is no exception. The classic theremin design employs each of the player’s hands as the grounded plate of a variable capacitor in an LC circuit. For the pitch antenna, this circuit is part of the oscillator. For the volume antenna, the hand capacitor detunes another oscillator, changing the attenuation in the amplifier. [Scott] and [Alex] put a twist on the theremin by using two IR sensors to control volume and pitch. The sensors compute the location of each hand and output a voltage inversely proportional to its distance from the hand. An ATMega1284P converts the signal to an 8-bit binary number for processing. They built four voices into it that are accessible through the push-button switch. The different voices are created with wave combinations and modulation effects. In addition to Classic Theremin, you can play in pure sine, sawtooth, and FM modulation. If you’re just not that into microcontrollers, you could build this digital IR theremin instead. If you find IR theremins soulless or plebeian, try this theremincello.
[Thanks Bruce] Filed under: Microcontrollers, musical hacks  |
| 6:01 pm | Software Advice for Anyone Thinking About a CNC Router
Excellent results can come from a small CNC router, but don’t forget the software! CNC tools, whatever their flavor, can greatly enhance your “making” or DIY ability. My current tool of choice is a CNC router. Being familiar with a manual milling machine, the concept seemed similar, and the price of these is quite reasonable when compared to some other tools. As described in this post, my machine is a Zen Toolworks model, but there are certainly other options to visit like this Probotix V90 model noted recently in this post. Although any number of CNC router models look great in videos and pictures, rest assured that even the best machines require some patience to get one running satisfactorily. Setting up the machine can be a challenge, as well as figuring out what your machine is capable of, but one thing that might slip peoples’ minds is the software involved. Read on to find out With a CNC router run by a computer (as opposed to a dedicated controller), you have three parts in your tool chain: Computer aided design (CAD), computer aided manufacturing (CAM), and a machine controller package. There are free and paid versions of each of these. Design Your Part Design courtesy of ESTLcam and my idea to shrink the knife block to make a “warrior dart holder.” The first step is to draw your part. To generate my part drawings, I’ve experimented with Inkscape, a vector graphics editor, and Draftsight, which is more or less free AutoCAD. Inkscape is a really cool program for generating more artistic pieces, like this random tree that I cut a while ago. If you want to do something more dimensionally-driven, my preferred tool is Draftsight. I’m very familiar with AutoCAD, and it’s available for Linux, Mac and Windows. If you want to get into 3D design, Sketchup seems to be more-or less the standard for casual makers/hackers/etc. Perhaps I’ve been spoiled or brainwashed by quite a few years of working with Pro/E, and Solidworks to a much smaller extent, because I found Sketchup frustrating. I find Pro/E (now Creo) frustrating as well at times, but I’m paid for that frustration. Regardless of what style or design program you choose, if you’re not familiar with the format, plan to spend a decent amount of time figuring out how to generate your parts. Generate Gcode Meshcam screen per my review G-Code, unlike what some mid 90′s rappers would have you believe, stands for General Code, and is what directly controls a CNC machine. You can write G-Code by hand, and for very simple circles or lines, this might be practical. For most circumstances, however, G-Code is much easier to produce using a CAM program to translate your CAD model into this format. I’ve tried out several packages, and all have their advantages and disadvantages: Along with actually learning the software, you’ll need to consider what kind of speed your machine can actually handle, and what to do so you don’t “crash” your machine. Your CAM program is where you set up your feeds, speeds, depth of cut, and other parameters. Control Your Router Mach3 to control your router Once your CAM program spits out possibly several thousand lines of G-Code, your machine control software is what gets everything moving. I use Mach3, which seems to be a common program for hobby machine control. Like everything else, it has a learning curve, but overall I’m quite happy with how it performs. One weakness I ran into with this (and that is probably true of other programs) is that you need an actual parallel port for it to work properly (not a USB-parallel adapter), and it’s not supposed to be run on a notebook because of possible power management issues. I’m sure there are workarounds, but in the interest of saving time, it might be a good idea to just dust off (or purchase) an old computer to run it on. It will run comfortably on slightly antiquated machines, so for $150 or so, you can have a computer that will run your router. Another option would be LinuxCNC. When I started leaning CNC, I was almost entirely unfamiliar with Linux. The challenge of leaning a new OS along with a new router seemed like too steep of a learning curve, so I haven’t tried this option. As I use Ubuntu quite a bit now, I might take a different track today. If you have worked extensively with LinuxCNC please share you experiences by leaving a comment below. To wrap things up, here’s two CNC videos that I’ve made. The first is me engraving a Tiger Paw, whereas the second video is a tutorial I did on how to engrave a logo using Inkscape. A CNC machine is a great addition to any shop, but as I hope I’ve pointed out here, not without its challenges!
Please note that separate from this post, I have received special pricing and/or samples in order to try out products from the companies representative of Zen Toolworks, Mach3, ESTLcam, and MeshCAM. Jeremy Cook is a Mechanical Engineer with a degree from Clemson University, and works in manufacturing and process automation. Additionally, Jeremy is an avid maker and former Hackaday staff writer. When he’s not at work or in the garage, you can find him on Twitter @JeremySCook, his projects blog JCoPro.net, or on his photography-related blog DIYTripods.com. Filed under: cnc hacks, Featured, tool hacks  |
| 3:00 pm | The World’s First Autonomous Flapping MAV
[Ferdinand] sent in a tip about the very cool DelFly Explorer, built by researchers at Netherlands’ Delft University of Technology, which is claimed to be the world’s first autonomous, flapping micro air vehicle. While it doesn’t fly like a typical ornithopter, the specs will convince you not to care. It has an 28 cm wingspan and weighs 20 grams, which includes motors, a battery, two cameras, and an autopilot. The autopilot uses accelerometers and a gyroscope, plus a barometer for altitude measurement. You can see the on-board video at the 35-second mark on the video (after the break). They are incredibly noisy images, but apparently the researchers have come up with some algorithms that can make sense of it. Put it all together, and you have a machine that can take off, maintain altitude, avoid obstacles, and fly for nine minutes. We’ve seen a cool ornithopter design before, and even a thrust vectoring plane, but this surpasses both projects. It’s pretty incredible what they have been able to fit into such a small design.
Filed under: drone hacks  |
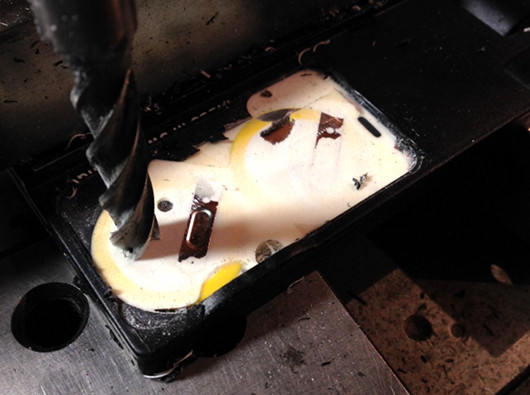
| 12:01 pm | Repairing a Non-Serviceable Welding Hood
[Unixgeek] owns an Optrel welding hood, which contains a lens that auto-adjusts for various welding tasks. It stopped working properly, and this hood is “Non-Serviceable”, so he had to either throw it away or hack it. The problem was that he knew it contained batteries, but they weren’t accessible. Using his milling machine, he was able to fix it himself. After removing the outer layer of plastic [Unixgeek] found that it was filled with foam. With continued milling he finally uncovered the batteries. They are standard CR2330 cells, so he could easily replace them, or set up a separate battery holder. We like seeing this sort of hack, as simple as it is, because of how much we truly hate devices with planned obsolescence built in. This is a >$300 safety device that gets broken when some coin cells finally die. Any sort of hack to keep people from having to throw away their devices is a good thing. Do you have a favorite planned obsolescence hack? Share it in the comments! Filed under: tool hacks  |